Posted on

October is for MYSTERY & Adventure!

Here comes Halloween and what every kid knows is the best time for Mystery and Adventure!  Dressing up, braving the elements, walking the streets in the dark, knocking on stranger’s doors – getting candy for free!!?  Everything we teach our kids not to do the whole rest of the year!

Well, I bring you a perfectly safe and fun “3D Mystery Adventure!” that I like to call Hugs & Kisses.  This is a “quilt-along” at your own pace sort of mystery quilt.  I’m providing 8 clues for the total project; the first one being posted via Facebook / TheMasqueradeNH on October 1st, 2019 at 10am.  You can also click on this link to get Clue 1 right here!

CLUE 1 and Supply List

After that you will be able to receive each of your next clues at your own pace!  Just send a pm via Facebook or email to TheMasqueradeNH @ gmail.com with a picture of your  finished clue pieces, and I will send you the next clue!

The only rules are:

  1. Do Not post any pictures of your progress (after Clue 4) publicly – definitely NO FINISHED QUILT pictures until after October 1st 2020.  I’m keeping this mystery running for the entire year so those who sew at a slower pace, or have way too much life getting in the way, can still have the fun of the mystery revealing itself in their own sewing space.
  2. Do Not request a clue every day.  Please take a break for 1 day in between requests so that you can catch up with things like shopping, cooking, kids, cleaning, laundry – did I say that?!  Anyway, it will give me time to keep up with the requests if this becomes a popular project.
  3. Please DO share this project with other quilting friends, so they can sew along with you and the rest of the group!  I will start an email list for anyone who is not on Facebook – and I promise I will never send out spam or sell your email address to a third party. (I hate that stuff!!!!)

That’s it!  Three simple rules!  The 8 clues will become your own copy of the pattern – and during this year it is totally FREE.  After that I will offer it for a minimal download fee on this website.

So make sure to check out www. facebook.com /TheMasqueradeNH to see any new information on our adventure, or send me an email: TheMasqueradeNH @ gmail.com  or   Donna @ TheMasquerade.net to be put on my 3D Mystery list.

During COVID19 “shelter at home” orders, I have decided to allow clue requests on a daily basis – so what are you waiting for?  Start a new fun project, and see your finished quilt in just over a week!  Your first clue is at the link above – and now I’m providing a second one! Click on this link for your Clue 2 !

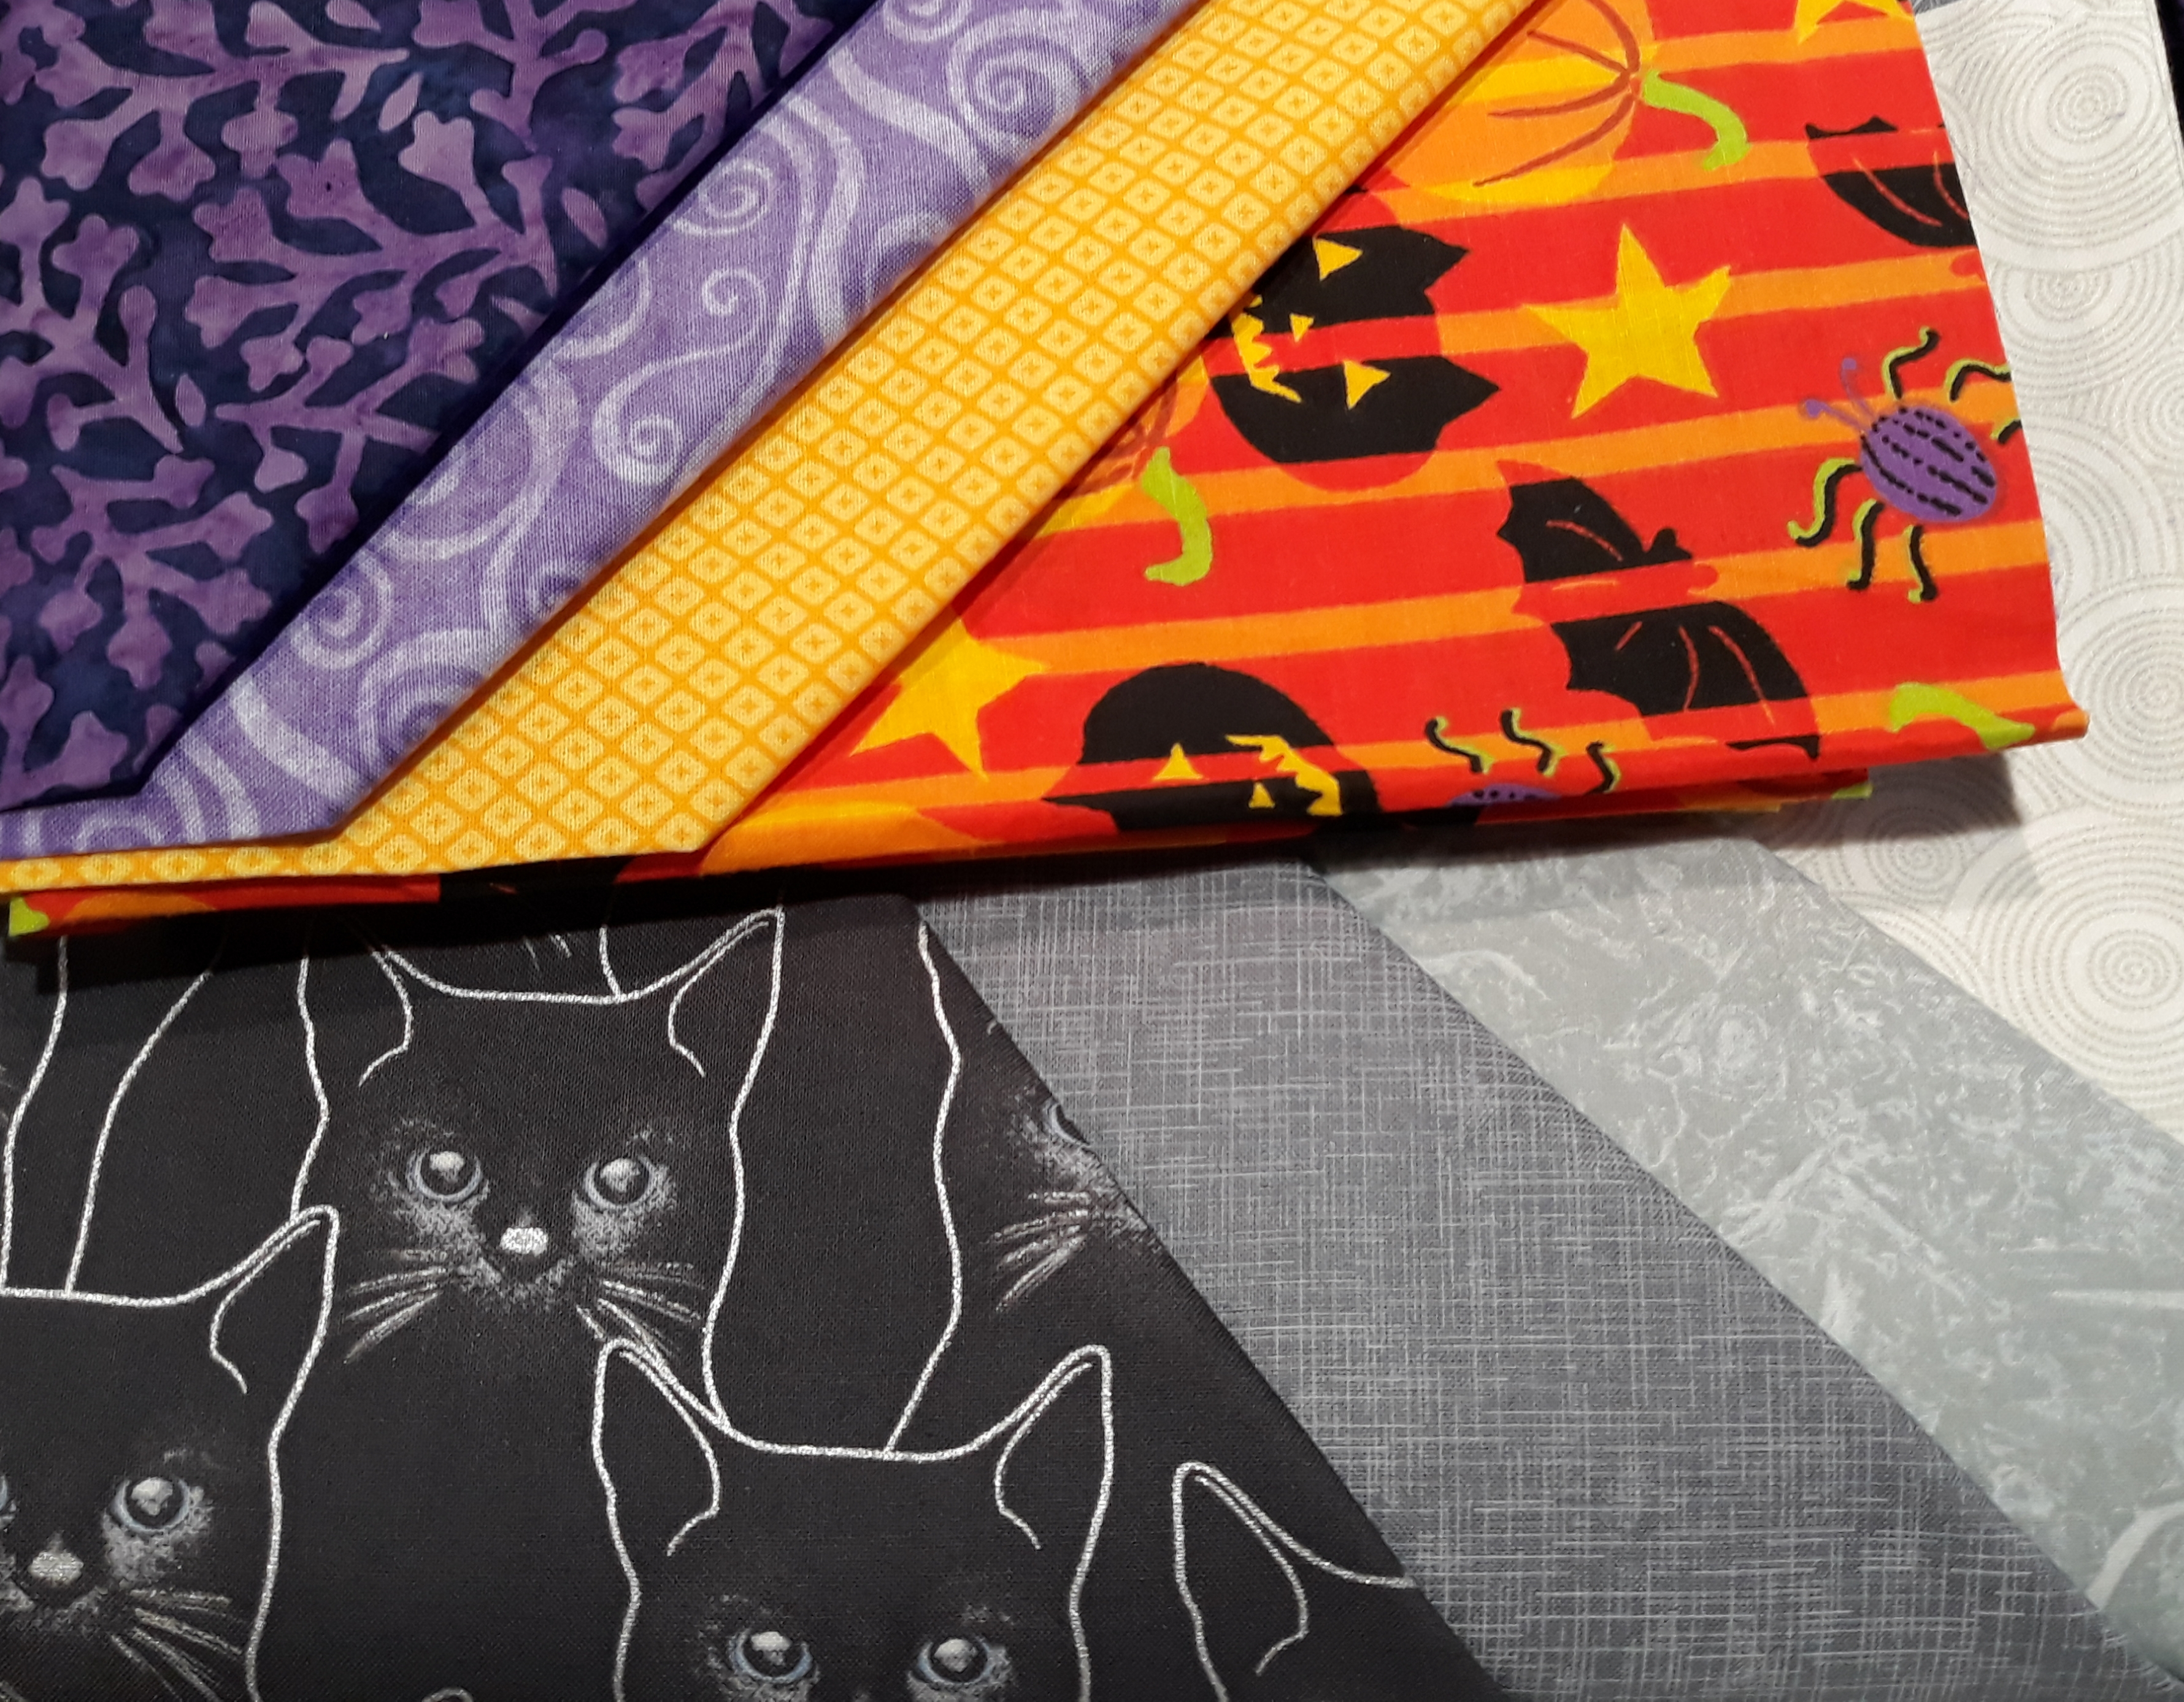
I’ve conveniently put together some kits of fabric, like the one pictured above for those who are too busy, or have difficulty picking fabric.  You will find a variety of kits choices on the “SHOP” page under “Project Kits” right here on this website.  However, if you want to shop for your own fabric, this is what you will need:

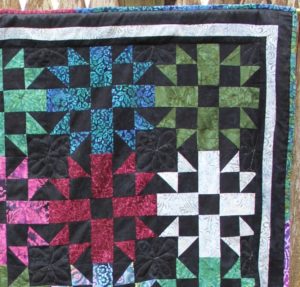
  1. 4 variations of neutrals ranging from white to black (with gray in between) or beige to brown (with gradations of tan in between).  1 yard of each.  If you often make mistakes while you quilt, then buy 1.25 yards of each – for piece of mind. These variations should show contrast between each step.  White/light gray/medium gray/dark gray – are a good example.  Or for a darker quilt, start with the light gray/medium gray/dark gray/black.  These fabrics will be numbered 1 – 4 from light to dark.
  2. Two colors that you love to combine – also in light, medium, dark variations.  You will need 1/4 yard of each as follows: light color 5 and medium version of the same color (we will call it color 6); medium color 7 (a different color than color 5, and make sure it’s one you like combining with the first one!), and a dark version of the same color.  For example, you might like to choose a light blue and medium blue, a medium green and a dark green as your 4 choices.  You will need just 1/4 yard of each.
  3. Finally, if you want to add a narrow border to your quilt, I suggest just a 3″ border.  You will need to purchase an additional 3/4 of a yard of one of your first 8 fabrics, or choose a different fabric that combines well with all the others.  You may also want to bind your quilt with the same fabric.  That would be another 1/2 yard.
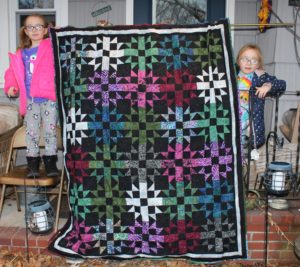
  4. Backing fabric will require 4 yards of 42″ wide, or 2 yards of 106″ wide fabric.  The finished size quilt is approximately 62″ x 82″

Hope you decide to join the fun!

Till next time,

Smiles,

Donna Viau

Posted on

The Season of Giving

Winter is upon us, and so is the cold weather up here in the North East.  That means cuddling up with a cozy quilt, and getting a toasty fire burning.  For me, it’s time to start a new quilt.  Recently, I’ve decided to teach my twin grand daughters how to sew.  When they were just 5 yrs old, I bought them each a little sewing machine – more of a toy than anything else, but they really did sew!  We started with sewing on paper without threading the machine – to practice manipulating the page to follow some lines – to see if we could make the machine sew where we wanted it to.  When we finally put some thread in the needle – we got busy making some simple puzzle quilts using squares and rectangles.  They were so proud of their first creations!!

Now they are 6 1/2 yrs old and itching to do more sewing/quilting.  We’ve worked on triangles and are in the process of putting together a fun quilt for their Dad as a gift.  The quilt has 30 blocks – each girl is trying to get 15 blocks complete. I’ll quilt and bind the quilt for them – after all, he is my son.  LOL

We found an easy block that has 4 half square triangles, 4 rectangles and a center square.  When the blocks are all put together, the girls decide it looks like a snow flurry.  So that’s what we are calling the pattern – “SNOW FLURRIES”.  I’m offering it here as a FREE download for those who want to tackle what my 6 yr olds are doing.  If you want to try teaching your child how to quilt; just be prepared for many moments of distraction, lots of irrelevant questions and tons of fidgeting at the machine.  If you can get past all of that; it’s fun to see them learn and grow with a new skill.  We try to sit down to quilt for no more than an hour at a time.  Any more would be too much for a child that young.  As it is, after 45 minutes they are itching to do something else – but it takes them an hour to make 1 block (at least it did at the beginning of the quilt)!

Fast forward from September 19th, to December 17th – and the quilt is done!  By the end, they were each able to finish 3 blocks in an hour.  Good thing, too – as they wanted to give this quilt as a gift and time was running out!  I kept the quilting simple – so it wouldn’t outshine all their hard work.  This is a gift that will be cherished, I’m sure.

They are happy to share their adventure.  So enjoy the following pictures.

If you want to try your hand at this fun quilt,  just click on the link below (“Snow Flurries Pattern”) to download your FREE copy of the pattern today!

Halfway done with the quilt and progress is getting quicker – two blocks in a day!

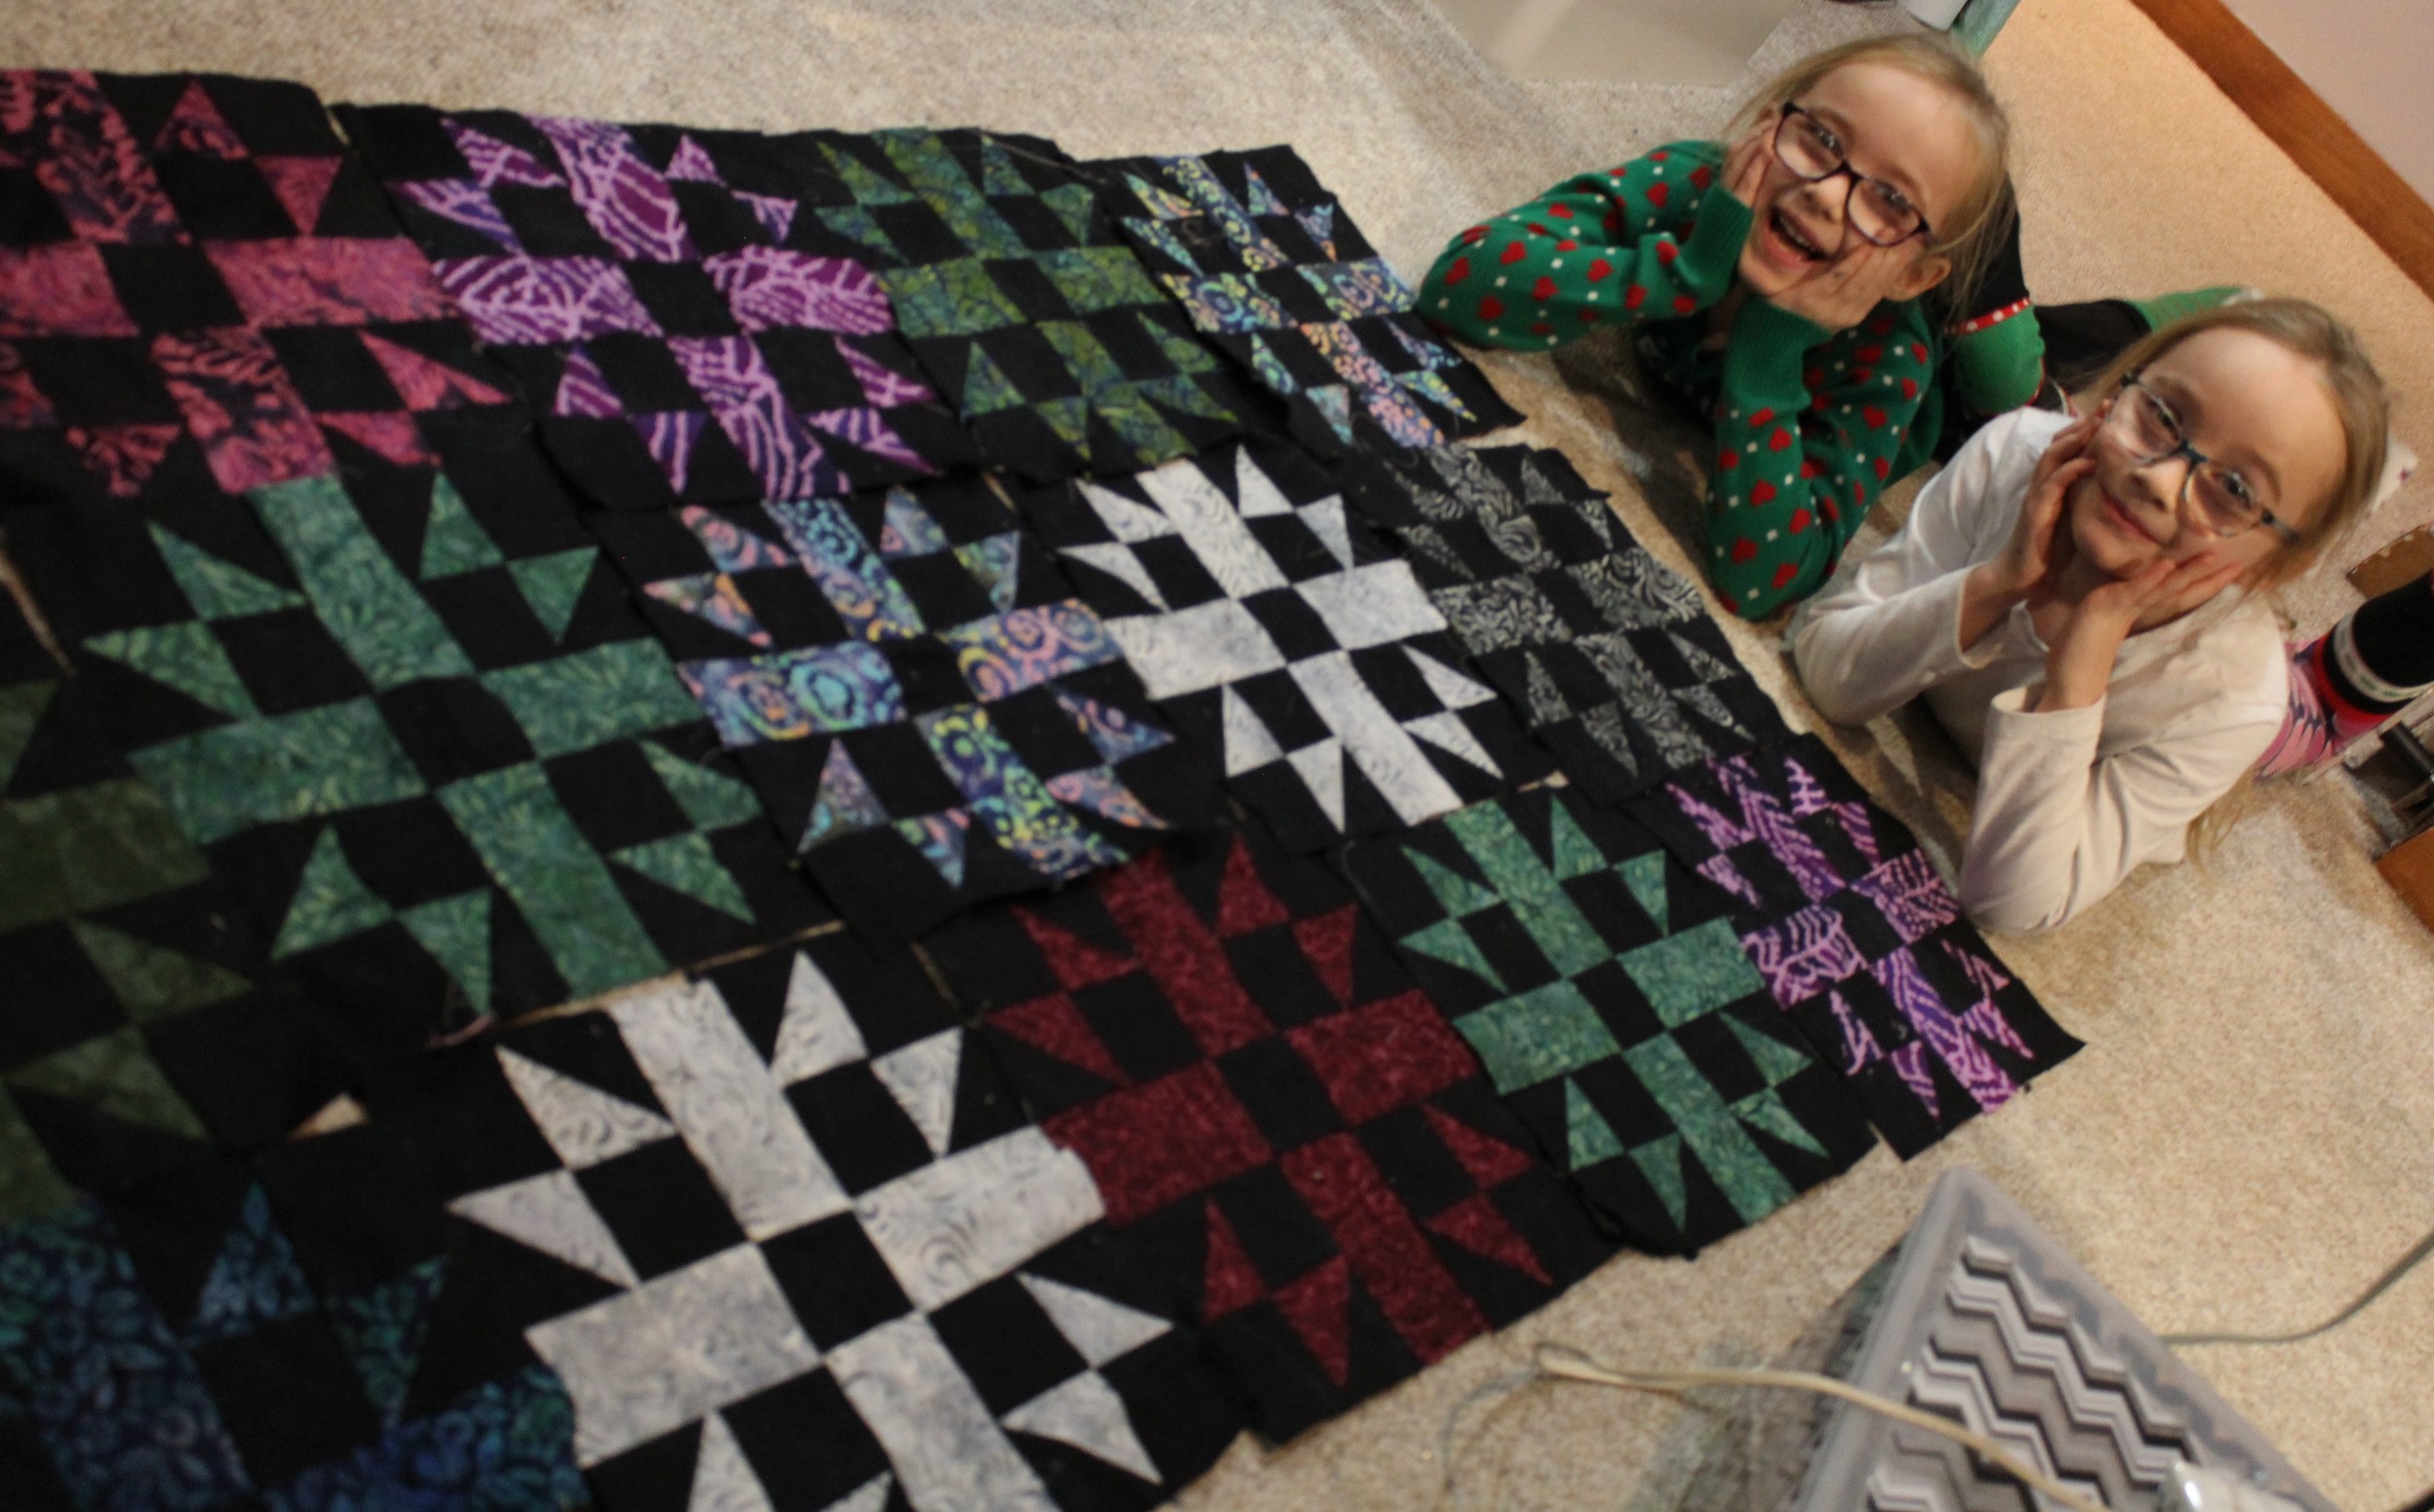
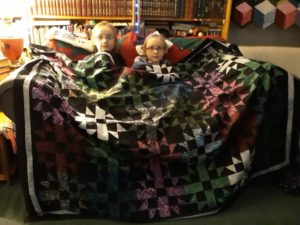
    Here’s the first half of the quilt!

By the end they got 3 blocks done on the last day! (and one of them found some time to throw together a little hooded costume! LOL)

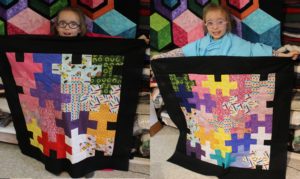
 Borders are on and it’s ready for quilting!

We backed it with fleece (using no batting) so it wouldn’t need too much quilting – just enough to hold it together.

Click on this link “Snow Flurries pattern” to get your free copy today!

Posted on

Magical Unicorn!

It’s all the craze! It seems like every young girl is into Unicorns lately; so I took it upon myself to create a pattern I could print out on letter paper and make available for all of you to download for free!

The pattern is easy enough that a 7 year old was able to make one – with a little help from an adult.  So here it is – my “Magical Unicorn” fun project #23 for you to download for FREE!  🙂

MAGICAL UNICORN instructions

Magical Unicorn Pattern Pieces

And here is a tutorial for you to follow along with while you create!  Have fun!!

Magical Unicorn Fun Project Series #23

Posted on

Out with the “OLD” – but let’s be nice!

Where did 2017 go?!  Wow – time really does fly when you are having fun – or just plain old. LOL

So here we are at the end of an old year and the beginning of a new one.  Many of us celebrate Christmas – and with that comes a Christmas tree and all the ornaments we put on it.  Some people like just some lights and fabric bows – others collect ornaments from past years – or ones their children made for them.  Sometimes it’s a real trip down memory lane!  I used to have a box full of memories – many of them breakable – that found a spot on my tree.  Hubby and I also used to insist on a “real” tree each year when the kids were small.  Along with the real tree came a real mess – and the need to dispose of the tree after Christmas was over.  We used to take off all the lights and ornaments, put them in a box and store them away – then cut up the very dry and hazardous tree and burn it in our fireplace on New Year’s Eve.  A “Yule Log” that would bring us good luck in the coming year.

Then one year after I packed all our breakable memories in a box and placed the box by the top of the cellar stairs (to bring down to storage later when I finished taking down more decorations), I went back to the living room to vacuum and tidy up.  Hubby’s brother was visiting and they were both well into celebrating New Year’s Eve.  As I was running the vacuum, the men decided to go out to the shed to get the saw to cut up the Christmas tree.  Hubby decided to use the back door to do this – which happens to be the door by the top of the cellar stairs.  He saw the “ornament” box – red & green Rubbermaid – and thought it strange that I didn’t bring it down the stairs.  He decided to help it on it’s way by nudging it with his boot till it toppled over the edge and rolled, bounced, twisted and opened all they way down the stairs.  I could hear it happening – even over the dun of the vacuum – and alas, knew I was too late to save the day.  All of our memories were broken into tiny little pieces all over the stairs.  When I got to the scene of the crime, Hubby was standing there with his jaw hanging wide and the guilty look a child gets when he’s caught with his hand in the cookie jar.  Well, nothing could be done to reverse the moment – so he continued out the door with apologies – to go get the saw; and I started vacuuming up all the pieces of the last 20 years from the cellar stairs.

For many years after that, we put up an artificial tree with nothing more than lights and some plaid fabric bows – with an occasional felt ornament here and there.  Then along came the grand children and some more lovely ornaments that were gifted to us from various people.  Then after many years of “fake” trees, we decided to go “real” again – and take the grandchildren “Christmas Tree Hunting” as a fun activity on a sleepover night.  I also chose this year to start a new tradition that I’d like to call a “Making Ornaments with your Grammy Party”.  We took a trip to the local pottery painting spot just a mile from my house – and painted our own ceramic very special ornaments.  Treasures I hope the children will keep and remember me by someday when they have their own homes and are decorating their own trees.  So, I thought – how can I make this a possibility – how can I keep these treasures safe – how can I teach the children to preserve and protect what we spent so much time painting and having fun making?  That’s when this quick idea came to me.  “Safe Pockets” – zip them up in a comfy soft bag of fleece and store them in a special box.  I went right out and bought decorative boxes for the children and then made a bunch of safe pocket sleeves.  My ornaments fill my sleeves and my box, but the children have big almost empty boxes with one sleeve that holds 6 ornaments.  This is so that they have something to look forward to in years to come.

Enjoy this quick tutorial “Safe Pockets – Fun Project #20” video.  Maybe you can use this method to preserve and protect your own breakable memories.  😉

Posted on

Lobster Fingers! Fun Project #15

What?! More like “save our fingers” when shucking that yummy lobster!  This is a very useful “fun project” if you like eating boiled or steamed lobster.  So quick to make – you can make a couple sets in just an hour!  Makes a great gift paired with some lobster eating tools and a fresh live lobster!  Click on this link:  Lobster Fingers for a FREE PATTERN  to make a few sets for your next lobster bake.

Posted on

Recycle – Reuse! Make something useful!

Old towels are a fact of life – we all find them in our laundry eventually.  I’ve decided never to throw them out – but reuse them instead.  Sure, you can cut them into squares and use them as rags; but why not make something useful AND cute out of them?  Here are 3 ways to make a bib – but once you get started, I’m sure you’ll think of many more styles and uses for “the bib”!  If you are not sure of size – then make sure you click on the link below for a FREE pdf pattern to get yourself started!

Towel BIB pattern

Posted on

Satin Flowers

I’ve had the pleasure of making satin and silk flowers to dress up ball gowns and to create wedding veils.  It’s really not all that difficult.  You just need some scraps of beautiful fabric and a needle and thread!  Thought I’d share the process with all of you who follow The Masquerade’s “Fun Project Series”.  Here is #12 – How to make Satin Flowers!  Click on the link below the video for a FREE pdf pattern of the flower pieces.

FREE Fabric Flower Pattern

Posted on

Floppy Bunny

Here’s a cute and cuddly fun little bunny to make!   I found the panel of fabric in my mother-in-laws very old stash. I’m guessing it’s probably 30+ years old. LOL  So I decided to make it on a really old sewing machine!  I bought myself a little Willcox & Gibbs hand crank chain stitch machine to celebrate a great year – and thought this would be the perfect “first project” to test it out.  What a great success!  The machine worked fantastic and the bunny is adorable (as I guessed it would be before I cut it out) – so I scanned in the pieces and made a PDF pattern to share.  So Merry Christmas and Happy Holidays to you!  Here is the tutorial and the free PDF pattern – just click on the links and HAVE FUN WITH THIS!  I can see it made from plaid flannel or printed fleece or what about minky?!  There’s no end to how cute and cuddly this bunny can be. 😉

https://themasquerade.net/wp-content/uploads/2016/12/Flop-Ear-Bunny-instructions.pdf

https://themasquerade.net/wp-content/uploads/2016/12/FloppyBunny-pattern-pieces.pdf

Make it “Crinkle Rattle & Jingle” in a few easy steps!  Here’s a link to upgrading your Floppy Bunny!